クラウドインフラ管理にTerraformを利用している方は多いのではないかと思います。弊社でもTerraformを利用してインフラを管理しています。
より効率的にTerraformを利用するには、ディレクトリ構造やリソース名の規則等についての設計が必要不可欠です。
しかしながら、最初に綿密に設計していても、リソースを追加していくうちに、リソース名をより適した名前に変更したり、Stateファイルを分割・統合したくなったりするケースが発生します。
今回、このような場合に使えるTerraformのリファクタリング方法3選についてご紹介したいと思います。
※ なお、執筆時点でのTerraformの最新バージョンは1.6系となります。
リソース名の変更
最初はリソース名を変更したい場合に利用できる方法です。
resource "google_storage_bucket" "my-bucket" {
  name          = "my-xxxxxx-test-bucket"
  location      = "ASIA-NORTHEAST1"
  force_destroy = true

  public_access_prevention = "enforced"
}
上記のリソース名 my-bucket を変更したい場合、以前までは terraform state mv を利用していたかたと思います。
v1.1.0から代わりに moved ブロックが利用できます。
moved ブロックを利用してリソース名をour-bucket に変更してみます。
resource "google_storage_bucket" "our-bucket" {
  name          = "my-xxxxxx-test-bucket"
  location      = "ASIA-NORTHEAST1"
  force_destroy = true

  public_access_prevention = "enforced"
}

moved {
  from = google_storage_bucket.my-bucket
  to = google_storage_bucket.our-bucket
}
terraform plan を実行するとリソース名の変更のみでリソースの追加や変更がないことが分かります。
  # google_storage_bucket.my-bucket has moved to google_storage_bucket.our-bucket
    resource "google_storage_bucket" "our-bucket" {
        id                          = "my-xxxxxx-test-bucket"
        name                        = "my-xxxxxx-test-bucket"
        # (13 unchanged attributes hidden)
    }

Plan: 0 to add, 0 to change, 0 to destroy.
applyが完了すると、追加した moved ブロックは削除しても問題ありません。
ただし上記のHashiCorp社のドキュメントにも記載されている通り、他から参照されている場合、参照しているTerraformのコード全てでapplyが成功されていることを確認する必要があります。
terrafrom state mv の場合、stateファイルを編集することから破壊的な変更になります。
moved ブロックの場合、planで確認してから実行できることから、より安全にリソース名の変更ができます。
リソースを別のStateファイルとして切り出す
管理しているリソースをライフサイクルの違い等から、別のStateファイルとして切り出したい場合があると思います。
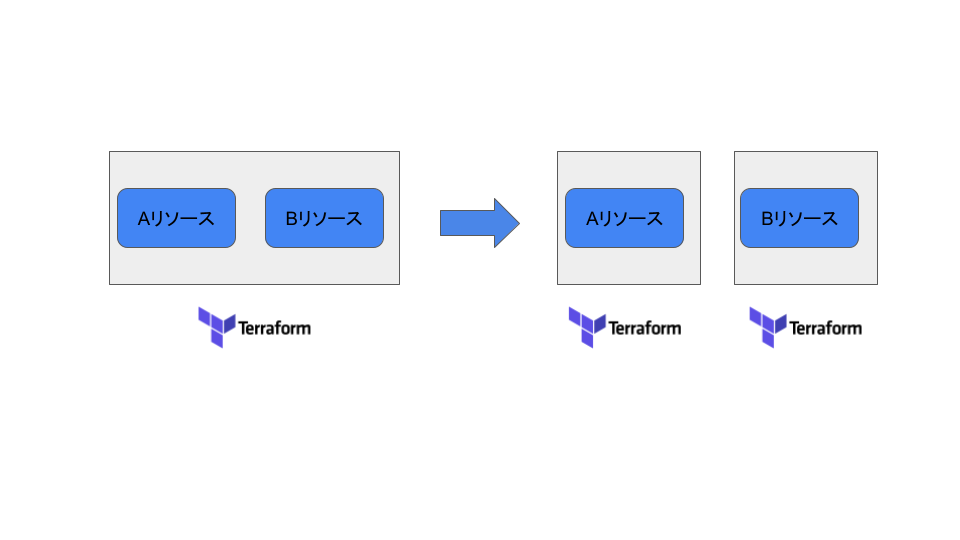
下記のようなコードから my-bucket-2を別ファイルとして切り出してみましょう。
resource "google_storage_bucket" "my-bucket-1" {
  name          = "test-bucket-xxxxxx-1"
  location      = "ASIA-NORTHEAST1"
  force_destroy = true

  public_access_prevention = "enforced"
}

resource "google_storage_bucket" "my-bucket-2" {
  name          = "test-bucket-xxxxxx-2"
  location      = "ASIA-NORTHEAST1"
  force_destroy = true

  public_access_prevention = "enforced"
}
手順としては下記の流れとなります。
- 別Terrafromファイルとして
my-bucket-2リソースをimport。 - 現在のStateファイルから
my-bucket-2リソースを削除
現在管理しているディレクトリとは別のディレクトリでmain.tfを新規に作成します。
import {
  id = "<project id>/test-bucket-xxxxxx-2"
  to = google_storage_bucket.my-bucket-2
}

resource "google_storage_bucket" "my-bucket-2" {
  name          = "test-bucket-xxxxxx-2"
  location      = "ASIA-NORTHEAST1"
  force_destroy = true

  public_access_prevention = "enforced"
}
リソースのimportにはv1.5.0から import ブロックが利用できます。
import ブロックを利用することで、planを利用してTerraformコードとリソースに差分がないことを確認してから、importを実行することができます。
Terraform will perform the following actions:

  # google_storage_bucket.my-bucket-2 will be updated in-place
  # (imported from "<project id>/test-bucket-xxxxxx-2")
  ~ resource "google_storage_bucket" "my-bucket-2" {
        default_event_based_hold    = false
        effective_labels            = {}
      ~ force_destroy               = false -> true
        id                          = "test-bucket-xxxxxx-2"
        labels                      = {}
        location                    = "ASIA-NORTHEAST1"
        name                        = "test-bucket-xxxxxx-2"
        project                     = "<project id>"
        public_access_prevention    = "enforced"
        requester_pays              = false
        self_link                   = "https://www.googleapis.com/storage/v1/b/test-bucket-xxxxxx-2"
        storage_class               = "STANDARD"
        terraform_labels            = {}
        uniform_bucket_level_access = false
        url                         = "gs://test-bucket-xxxxxx-2"

      - timeouts {}
    }

Plan: 1 to import, 0 to add, 1 to change, 0 to destroy.
applyが完了したら、importブロックは削除しても大丈夫です。
次に既存のStateファイルから my-bucket-2 を削除します。
Stateファイルをリモートで管理している場合は現在のstateファイルをバックアップします。
$ terraform state pull > backup.tfstate
現在のリソースを確認します。
$ terraform state list
google_storage_bucket.my-bucket-1
google_storage_bucket.my-bucket-2
my-bucket-2を削除します。
$ terraform state rm google_storage_bucket.my-bucket-2
Removed google_storage_bucket.my-bucket-2
Successfully removed 1 resource instance(s).
Stateファイルの変更をする場合に、backendをローカルに変更し、ローカル Stateファイルに対して操作をし、変更後にpushする方法でも問題ないです。
リソースを別のStateファイルに移動する
最後はリソースを別のStateファイルに移動するケースです。
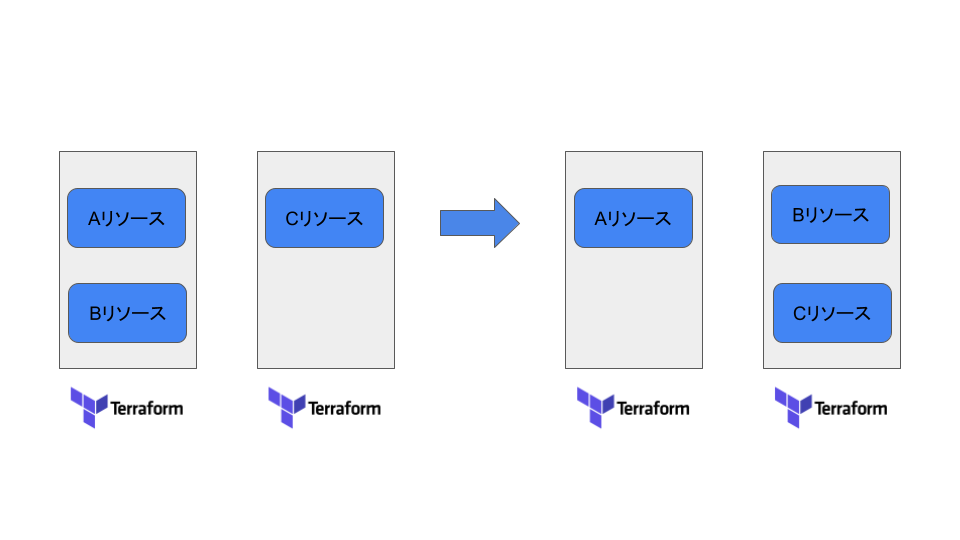
terraform state mv を利用して、Stateファイルから別のStateファイルにリソースを移動します。
ディレクトリの構造は下記のようになっているとします。
.
├── directory-a
│   ├── main.tf
│   ├── provider.tf
│   ├── terraform.tfstate
│   └── terraform.tfstate.backup
└── directory-b
    ├── main.tf
    ├── provider.tf
    ├── terraform.tfstate
    └── terraform.tfstate.backup
下記のTerraformコードから my-bucket-2 を directory-b に移動しましょう。(リモートでStateファイルを管理している場合は、backendをローカルに変更しておく必要があります。)
# directory-a
resource "google_storage_bucket" "my-bucket-1" {
  name          = "test-bucket-xxxxxx-1"
  location      = "ASIA-NORTHEAST1"
  force_destroy = true

  public_access_prevention = "enforced"
}

resource "google_storage_bucket" "my-bucket-2" {
  name          = "test-bucket-xxxxxx-2"
  location      = "ASIA-NORTHEAST1"
  force_destroy = true

  public_access_prevention = "enforced"
}
# directory-b
resource "google_storage_bucket" "my-bucket-3" {
  name          = "test-bucket-xxxxxx-3"
  location      = "ASIA-NORTHEAST1"
  force_destroy = true

  public_access_prevention = "enforced"
}
directory-b でtfstateファイル名を変更しておきます。
$ cp -p terraform.tfstate terraform-b.tfstate
directory-a のtfstateファイルをコピーします。
$ cp -p ../directory-a/terraform.tfstate terraform-a.tfstate
terraform state mv を利用して、terraform-a.tfstate から terraform-b.tfstate にリソース my-bucket-2 を移動します。
$ terraform state mv -state=terraform-a.tfstate -state-out=terraform-b.tfstate google_storage_bucket.my-bucket-2 google_storage_bucket.my-bucket-2
Move "google_storage_bucket.my-bucket-2" to "google_storage_bucket.my-bucket-2"
Successfully moved 1 object(s).
正常に移動されたかを確認します。
$ terraform state list -state=terraform-b.tfstate
google_storage_bucket.my-bucket-2
google_storage_bucket.my-bucket-3
tfstateファイルを上書きします。
$ cp -p terraform-b.tfstate terraform.tfstate
$ cp -p terraform-a.tfstate ../directory-a/terraform.tfstate
Terraformコードを下記のように変更します。
# directory-a
resource "google_storage_bucket" "my-bucket-1" {
  name          = "test-bucket-xxxxxx-1"
  location      = "ASIA-NORTHEAST1"
  force_destroy = true

  public_access_prevention = "enforced"
}
# directory-b
resource "google_storage_bucket" "my-bucket-2" {
  name          = "test-bucket-xxxxxx-2"
  location      = "ASIA-NORTHEAST1"
  force_destroy = true

  public_access_prevention = "enforced"
}

resource "google_storage_bucket" "my-bucket-3" {
  name          = "test-bucket-xxxxxx-3"
  location      = "ASIA-NORTHEAST1"
  force_destroy = true

  public_access_prevention = "enforced"
}
最後に terraform plan をしてリソースに差分がないことを確認します。
# directory-aでの実行
$ terraform plan
google_storage_bucket.my-bucket-1: Refreshing state... [id=test-bucket-xxxxxx-1]

No changes. Your infrastructure matches the configuration.

# directory-bでの実行
$ terraform plan
google_storage_bucket.my-bucket-3: Refreshing state... [id=test-bucket-xxxxxx-3]
google_storage_bucket.my-bucket-2: Refreshing state... [id=test-bucket-xxxxxx-2]

No changes. Your infrastructure matches the configuration.
まとめ
Terraformのリファクタリングを行う際には、Stateファイルの変更が必要になりますが、変更は基本的には破壊的な変更になるため、実行には注意を払う必要があります。
moved ブロックや imported ブロックが登場したことにより、以前より安全にStateファイルの変更ができるようになりました。
そのため、以前よりは気軽にリファクタリングができるようになったかと思います。